
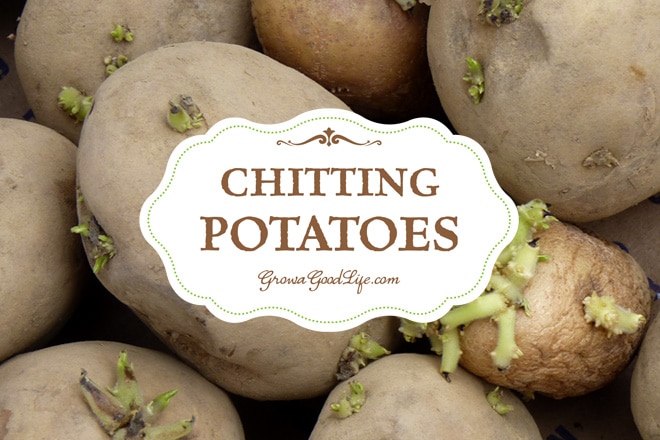
To chit potatoes, place them in a cool, bright spot to encourage sprouting. Ensure the eyes face upwards.
Chitting potatoes, also known as greensprouting, is a crucial step for a healthy crop. By allowing seed potatoes to sprout before planting, you give them a head start. This process helps in faster growth and earlier harvests. Place your seed potatoes in a single layer in a cool, well-lit area.
Ensure they are not exposed to direct sunlight, which can cause them to dry out. Chitting typically takes about 4-6 weeks. This preparation will lead to stronger plants and a more bountiful potato harvest. Follow these simple steps to maximize your potato yield and enjoy a successful gardening season.

Credit: growinginthegarden.com
Introduction To Chitting
Chitting potatoes is an essential step in preparing seed potatoes for planting. This process involves encouraging the seed potatoes to sprout before they go into the soil. By chitting, you can get a head start on the growing season.
Chitting helps ensure that your potato plants are strong and healthy. Let’s dive into what chitting is and why it is important.
What Is Chitting?
Chitting refers to the method of pre-sprouting seed potatoes before planting them. This process involves placing the potatoes in a light, cool environment. The goal is to encourage the growth of short, sturdy sprouts.
To chit potatoes, follow these steps:
- Choose healthy seed potatoes.
- Place them in a shallow tray or egg carton.
- Ensure the eyes of the potatoes face upwards.
- Keep them in a cool, light place, around 50°F.
- Wait for 2-3 weeks until sprouts are about 1 inch long.
Why Chit Potatoes?
Chitting provides several benefits that improve the growth of your potato plants:
- Faster Growth: Pre-sprouted potatoes establish more quickly in the soil.
- Better Yield: Stronger plants produce more and larger potatoes.
- Reduced Risk of Rot: Chitted potatoes are less likely to rot in the ground.
By chitting your potatoes, you can ensure a more productive and healthier potato crop.
Choosing The Right Seed Potatoes
Choosing the right seed potatoes is essential for a successful harvest. Healthy seed potatoes produce robust plants. This section guides you on selecting the best varieties and purchasing sources.
Best Varieties For Chitting
Certain potato varieties are excellent for chitting. Here are some popular choices:
- Yukon Gold: Known for their creamy texture and buttery flavor.
- Red Pontiac: Red-skinned with white flesh, perfect for boiling.
- Russet Burbank: Ideal for baking and frying, with a fluffy texture.
- Kennebec: Great all-purpose potato with good disease resistance.
Where To Buy Seed Potatoes
Finding a reliable source for seed potatoes ensures quality and disease-free tubers. Below are some recommended options:
| Source | Benefits |
|---|---|
| Local Garden Centers | Easy access, supports local businesses, usually disease-free. |
| Online Retailers | Wide variety, convenient, often provide detailed product information. |
| Farmers’ Markets | Directly from growers, fresh, can ask questions about cultivation. |
Preparing For Chitting
Chitting potatoes, also known as greensprouting, helps you get a head start on your planting season. Preparing your seed potatoes for chitting is a simple yet crucial step. It ensures your potatoes grow strong and healthy. This guide will help you get everything ready for chitting.
When To Start Chitting
Start chitting your potatoes about six weeks before you plan to plant them. This is usually from late January to early February. If you start too early, the sprouts might get too long and fragile. Starting too late means your potatoes might not have enough time to grow strong sprouts.
Required Materials
Gathering the right materials will make the chitting process easier. Here’s what you will need:
- Seed Potatoes: Choose healthy, certified seed potatoes.
- Egg Cartons: These will hold the potatoes in place.
- Cool, Light Place: Find a space with indirect sunlight and a temperature of 50°F to 60°F (10°C to 15°C).
- Labeling Supplies: Use labels to keep track of different potato varieties.
Using a table can help you organize your materials:
| Material | Description |
|---|---|
| Seed Potatoes | Healthy, certified for disease-free growth |
| Egg Cartons | Holds potatoes upright |
| Cool, Light Place | Indirect sunlight, 50°F to 60°F (10°C to 15°C) |
| Labeling Supplies | Labels to track varieties |
Once you have your materials ready, you can start chitting your seed potatoes. Make sure to place them with the eyes facing upwards. This will help the sprouts grow strong and healthy.
Chitting Process Step-by-step
Chitting potatoes, also known as greensprouting, helps them sprout before planting. This process leads to faster growth and a better harvest. Follow these steps to chit your seed potatoes effectively.
Setting Up Your Space
First, choose a cool, light-filled area. A garage or porch works well. Ensure the space stays between 50-70°F.
Next, prepare a flat surface. This can be a table or shelf. Clean the surface to avoid contamination. Lay down some newspaper or cardboard to protect the area.
Positioning Seed Potatoes
Place your seed potatoes on the surface. Ensure the eyes face upwards. These are small, dimpled areas where sprouts form.
Space the potatoes 1-2 inches apart. This allows air circulation. Avoid crowding them to prevent rot.
For easy access, arrange them in rows. This helps you monitor their progress. You can also use egg cartons to hold smaller potatoes.
| Step | Action |
|---|---|
| 1 | Choose a cool, light-filled area. |
| 2 | Prepare a flat, clean surface. |
| 3 | Lay down newspaper or cardboard. |
| 4 | Position seed potatoes with eyes facing upwards. |
| 5 | Space them 1-2 inches apart. |
By following these steps, your seed potatoes will be ready to plant in no time. Happy gardening!
Optimal Conditions For Chitting
Chitting potatoes, or greensprouting, is crucial for a bountiful harvest. Providing optimal conditions is key for successful chitting. Let’s explore the necessary conditions to help your seed potatoes sprout healthily.
Ideal Light Conditions
Light plays a vital role in the chitting process. Potatoes need indirect sunlight for proper sprouting. Place the seed potatoes in a well-lit room. Avoid direct sunlight to prevent overheating.
A windowsill that receives diffused light is perfect. This light helps the potatoes develop strong, green shoots. Ensure the light source is consistent for best results.
Temperature And Humidity
Maintaining the right temperature and humidity is essential. The ideal temperature range for chitting is 50-60°F (10-15°C). Too warm or too cold can hinder sprouting.
| Temperature | Effect on Chitting |
|---|---|
| Below 50°F (10°C) | Slow or no sprouting |
| 50-60°F (10-15°C) | Optimal sprouting |
| Above 60°F (15°C) | Weak, elongated shoots |
Humidity levels should be moderate. High humidity can cause mold. Low humidity might dry out the potatoes. Aim for a 50-70% humidity level.
Use a hygrometer to monitor the humidity. Adjust the environment accordingly to maintain the optimal range.
Credit: growagoodlife.com
Monitoring Progress
Monitoring the progress of your chitting potatoes is crucial. This ensures they are sprouting well and ready for planting. Regular checks help you spot any issues early and take action. Here’s how to monitor the progress effectively.
Signs Of Successful Chitting
Successful chitting shows healthy sprouts. Look for the following signs:
- Short, Sturdy Sprouts: Sprouts should be short and thick, about 1 inch.
- Green or Purple Color: Healthy sprouts are green or purple, not white.
- Multiple Sprouts: Each potato should have several sprouts.
Common Issues And Solutions
Chitting problems can occur. Here are common issues and how to solve them:
| Issue | Solution |
|---|---|
| Sprouts are too long and spindly | Move to a cooler, brighter location. |
| Sprouts are white | Ensure they get enough light. |
| Potatoes are shriveling | Increase humidity or reduce heat. |
| No sprouts appearing | Check the potatoes are viable and not too old. |
Planting Chitted Potatoes
Planting chitted potatoes can lead to a better harvest. Chitted potatoes sprout faster and grow stronger. This section will guide you on planting chitted potatoes for the best results.
When To Plant
Knowing the right time to plant is crucial. Plant your chitted potatoes after the last frost. The soil temperature should be at least 45°F. This usually happens in early spring. If you plant too early, frost may damage your potatoes.
Preparing The Soil
Proper soil preparation ensures your potatoes grow well. Follow these steps for the best soil:
- Choose a sunny spot.
- Ensure the soil is well-drained.
- Remove all weeds and stones.
- Add compost or well-rotted manure.
Test the soil pH. Potatoes prefer slightly acidic soil. A pH between 5.0 and 6.0 is ideal.
| Soil Preparation Steps | Details |
|---|---|
| Location | Sunny spot, well-drained soil |
| Weed Removal | Remove weeds and stones |
| Soil Enrichment | Add compost or manure |
| pH Level | 5.0 to 6.0 |
Once the soil is ready, you can plant your chitted potatoes. Follow these steps for planting:
- Dig a trench about 4 inches deep.
- Place the chitted potatoes with the sprouts facing up.
- Space each potato about 12 inches apart.
- Cover the potatoes with soil.
Water the soil well after planting. Keep the soil moist as the plants grow.

Credit: www.shutterstock.com
Caring For Potato Plants
Caring for potato plants ensures a healthy and abundant harvest. Proper care includes watering, fertilizing, and managing pests and diseases. Learn how to provide the best care for your potato plants with these essential tips.
Watering And Fertilizing
Watering potato plants is crucial for their growth. Keep the soil evenly moist. Avoid waterlogging to prevent rot. Water the plants early in the morning or late in the evening. This reduces evaporation and ensures the roots absorb the moisture.
Proper fertilizing helps potatoes grow strong and healthy. Use a balanced fertilizer with equal parts nitrogen, phosphorus, and potassium. Apply the fertilizer once the plants are 6 inches tall. Follow these steps for a successful fertilizing routine:
- Mix the fertilizer into the soil around the base of each plant.
- Water the plants thoroughly after applying the fertilizer.
- Repeat the process every 4-6 weeks during the growing season.
Pest And Disease Control
Protecting your potato plants from pests and diseases is essential. Common pests like aphids, beetles, and nematodes can damage the plants. Use these methods to control pests:
- Inspect the plants regularly for signs of pests.
- Remove pests by hand or use insecticidal soap.
- Introduce natural predators like ladybugs to control aphid populations.
Diseases such as blight and scab can also affect potatoes. Follow these tips to manage diseases:
- Practice crop rotation to reduce disease risk.
- Ensure proper spacing to improve air circulation.
- Remove and destroy infected plants immediately.
- Use disease-resistant potato varieties when possible.
By following these care tips, you can ensure your potato plants remain healthy and productive throughout the growing season.
Harvesting And Storage
Knowing the right time to harvest and store your potatoes is crucial. It ensures they remain fresh and tasty for a long time. Below, we break down the steps to help you get it right.
When To Harvest
Harvest your potatoes when the foliage turns yellow and starts to die back. This is a clear sign that your potatoes are ready. Use a garden fork to gently lift the potatoes out of the soil.
Be careful not to damage the potatoes while digging them up. Damaged potatoes can rot quickly, ruining your hard work. Once harvested, let the potatoes dry in a cool, dark place for a few hours.
Storing Your Potatoes
Proper storage keeps your potatoes fresh for months. Follow these steps to store them correctly:
- Brush off excess soil, but do not wash the potatoes.
- Store them in a well-ventilated, dark place.
- Ideal storage temperature is between 45°F and 50°F (7°C-10°C).
- Use burlap sacks or paper bags for storage.
Avoid storing potatoes with onions. The gases from onions can spoil the potatoes. Check your stored potatoes regularly for any signs of rot or sprouting.
Here is a simple table to summarize the storage conditions:
| Condition | Recommendation |
|---|---|
| Temperature | 45°F-50°F (7°C-10°C) |
| Light | Keep in the dark |
| Ventilation | Good airflow |
| Storage Bags | Burlap or paper bags |
Following these steps will help you keep your potatoes fresh and ready to use. Happy harvesting!
Frequently Asked Questions
What Is Chitting Potatoes?
Chitting potatoes is the process of encouraging seed potatoes to sprout before planting. It helps in faster growth and better yield.
Why Should You Chit Potatoes?
Chitting potatoes allows them to sprout early. This leads to quicker establishment in the soil and potentially higher yields.
How Long To Chit Potatoes Before Planting?
Typically, chit potatoes for about 4-6 weeks before planting. This ensures strong, healthy sprouts ready for the garden.
Where To Place Potatoes For Chitting?
Place seed potatoes in a cool, light area. A windowsill or unheated room works best to encourage sprouting.
Conclusion
Chitting potatoes is a simple process that can boost your harvest. Start early and choose healthy seed potatoes. Position them in a cool, bright spot. Patience is key as sprouts develop. Follow these steps for a successful growing season. Enjoy a bountiful yield of delicious, homegrown potatoes.