To grow luffa, plant seeds in warm soil and provide plenty of sunlight and water. Harvest when the skin turns brown and starts to peel.
Growing your own luffa sponges is both rewarding and sustainable. These natural sponges come from the luffa plant, a type of gourd. Ideal for warm climates, luffa thrives in well-drained soil with ample sunlight. Start seeds indoors if you live in cooler regions, transplanting them outside after the last frost.
Proper care includes regular watering and support for climbing vines. Harvesting at the right time ensures high-quality sponges. This guide provides essential tips to help you successfully grow and harvest your own luffa sponges, contributing to a more eco-friendly lifestyle.

Credit: www.goodhousekeeping.com
Introduction To Luffa
Have you ever wondered how to grow your own natural sponges? Luffa, also known as loofah, is a versatile plant that produces fibrous fruits. These fruits can be dried and used as sponges. They are popular for both cleaning and skincare purposes. Growing luffa is simple and rewarding. Let’s dive into what luffa is and the benefits of growing it in your garden.
What Is Luffa?
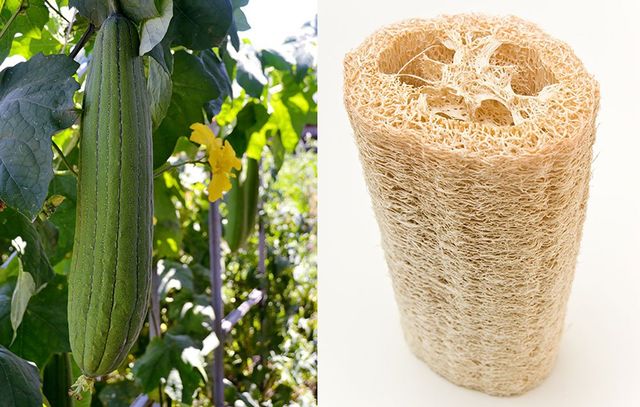
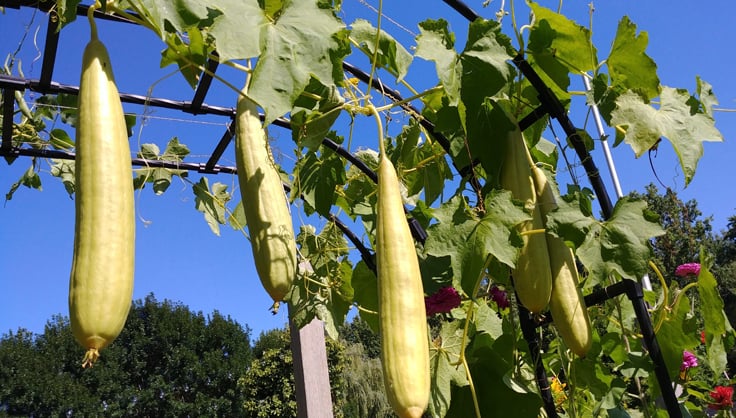
Luffa is a type of vine plant belonging to the cucumber family. It produces long, green fruits that resemble large zucchinis. When these fruits mature, they develop a tough, fibrous interior. This fibrous network is what becomes the sponge. Luffa plants thrive in warm climates and need plenty of sunlight and water.
| Characteristic | Description |
|---|---|
| Family | Cucumber |
| Climate | Warm |
| Sunlight | Full Sun |
| Water | Regular |
Benefits Of Growing Luffa
Growing luffa offers many benefits. First, it produces natural sponges free from chemicals. This makes them perfect for cleaning and personal care. Second, luffa sponges are biodegradable and environmentally friendly. This helps reduce plastic waste.
- Natural and chemical-free
- Biodegradable and eco-friendly
- Dual-purpose: cleaning and skincare
- Easy to grow in warm climates
Lastly, luffa plants can enhance your garden’s beauty. They have attractive vines and flowers. Growing your own luffa can be a fun and educational project for the whole family.

Credit: www.gardeners.com
Choosing The Right Variety
Growing luffa at home can be a rewarding experience. The type of luffa you choose plays a key role in your success. Each variety has its own unique characteristics. This guide will help you select the best luffa for your needs.
Types Of Luffa
There are two main types of luffa:
- Luffa aegyptiaca – Also known as sponge gourd. It is the most common type used for sponges.
- Luffa acutangula – Often called ridged or angled luffa. This type is less common but still useful.
Best Varieties For Home Growing
Not all luffa varieties are suitable for home gardens. Here are some of the best options:
| Variety | Type | Features |
|---|---|---|
| Smooth Boy | Luffa aegyptiaca | Produces smooth, high-quality sponges. |
| Asian Hybrid | Luffa acutangula | Fast-growing and disease-resistant. |
| Vietnamese Luffa | Luffa aegyptiaca | Well-suited for tropical climates. |
These varieties are known for their high yield and quality sponges. Choose the one that best fits your climate and garden space.
Starting with the right variety sets you up for a successful harvest. Happy gardening!
Preparing For Planting
Growing luffa sponges starts with proper planning. The first step involves preparing the planting area. This section will guide you through selecting the location and soil preparation for your luffa plants.
Selecting The Location
Choose a sunny spot for your luffa plants. They need at least six hours of sunlight daily. The location should have good air circulation to prevent mold. Ensure the area is free from strong winds. Luffa plants grow well on trellises or fences, so pick a place with support.
Soil Preparation
Luffa plants thrive in well-drained, fertile soil. Test your soil’s pH level; it should be between 6.0 and 6.8. Use a soil testing kit for accurate results. If the pH is too low, add lime to increase it. For high pH, add sulfur to lower it.
| Soil Component | Action |
|---|---|
| Organic Matter | Add compost to enrich the soil. |
| Drainage | Ensure good drainage by mixing sand. |
| Fertility | Use balanced fertilizer to boost growth. |
After adjusting the soil, till it to a depth of 12 inches. Remove any weeds or rocks. Make sure the soil is loose and easy for roots to penetrate. Water the soil lightly to settle it before planting.
Using mulch can help retain moisture and keep weeds at bay. Spread a thin layer of mulch around your planting area. This will help maintain a consistent soil temperature.
Following these steps ensures your luffa plants have the best start. Proper location and soil preparation are key to a successful luffa harvest.

Credit: savvygardening.com
Planting Luffa Seeds
Growing your own luffa sponges starts with planting luffa seeds. This guide will help you understand the best time to plant and offer tips for successful seed germination. Follow these steps to ensure a healthy crop of luffa plants.
When To Plant
It’s essential to plant luffa seeds at the right time. Luffa plants need warm temperatures to thrive. The best time to plant luffa seeds is after the last frost in spring. You can start seeds indoors 6-8 weeks before the last frost date.
If you live in a region with a long growing season, you can also direct sow the seeds outdoors. Make sure the soil temperature is at least 70°F (21°C) for optimal germination.
Seed Germination Tips
Proper seed germination is crucial for healthy luffa plants. Here are some tips:
- Soak the seeds: Soak luffa seeds in warm water for 24 hours before planting. This softens the seed coat and speeds up germination.
- Use quality soil: Plant the seeds in well-draining, nutrient-rich soil. Avoid heavy clay or waterlogged soil.
- Plant depth: Sow seeds 1/2 inch deep. Cover lightly with soil and water gently.
- Maintain moisture: Keep the soil consistently moist but not soggy. Too much water can cause seeds to rot.
- Provide warmth: Place seed trays in a warm location. Use a heat mat if necessary to maintain a temperature of 70-85°F (21-29°C).
Follow these steps to ensure your luffa seeds germinate successfully. With the right care, you’ll soon have healthy luffa plants ready to produce natural sponges.
Caring For Luffa Plants
Proper care is essential for healthy luffa plants. This guide covers watering needs and fertilization practices to help your luffa thrive.
Watering Needs
Luffa plants need consistent watering. Keep the soil moist but not waterlogged. Water the plants deeply, allowing the water to reach the roots. This ensures the plants get enough hydration.
Use a soaker hose or drip irrigation system. This helps in providing even moisture. Avoid overhead watering, which can cause fungal diseases. Water early in the morning to prevent evaporation.
Fertilization Practices
Fertilizing luffa plants helps them grow strong and healthy. Use a balanced fertilizer with equal parts nitrogen, phosphorus, and potassium. Apply the fertilizer at planting time and every four weeks during the growing season.
Here’s a simple fertilization schedule:
| Time | Fertilizer Type |
|---|---|
| Planting Time | Balanced Fertilizer (10-10-10) |
| Every 4 Weeks | Balanced Fertilizer (10-10-10) |
Mix the fertilizer into the soil around the plant base. Water the soil after fertilizing to help nutrients reach the roots.
Organic options like compost or well-rotted manure are also good choices. These improve soil structure and provide essential nutrients.
Managing Pests And Diseases
Growing luffa can be a rewarding experience. But, you need to manage pests and diseases. This guide will help you keep your plants healthy.
Common Pests
Luffa plants attract several pests. Knowing these pests can help you control them.
- Aphids: Tiny insects that suck plant sap. They can weaken the plant.
- Cucumber Beetles: Small beetles that chew on leaves and flowers.
- Spider Mites: Very small pests that cause yellow spots on leaves.
- Squash Bugs: These bugs suck sap and can cause plants to wilt.
To control these pests, you can:
- Use insecticidal soap on affected areas.
- Remove pests by hand if possible.
- Introduce natural predators like ladybugs.
Disease Prevention
Diseases can also affect your luffa plants. Preventing diseases is easier than treating them.
- Powdery Mildew: A white, powdery fungus on leaves.
- Downy Mildew: Causes yellow spots and fuzzy growth on leaves.
- Bacterial Wilt: Causes plants to wilt and die.
To prevent diseases, follow these tips:
- Plant luffa in well-drained soil.
- Water plants at the base, not on leaves.
- Rotate crops each year to avoid soil-borne diseases.
- Remove and destroy infected plants promptly.
- Use disease-resistant luffa varieties.
| Disease | Symptoms | Prevention |
|---|---|---|
| Powdery Mildew | White powder on leaves | Avoid overhead watering |
| Downy Mildew | Yellow spots, fuzzy growth | Use resistant varieties |
| Bacterial Wilt | Plants wilt and die | Rotate crops yearly |
By managing pests and diseases, your luffa plants will thrive. Follow these tips for a successful harvest.
Harvesting Luffa Sponges
Growing luffa is an exciting gardening project. Once the plants mature, it’s time to harvest the sponges. Harvesting luffa sponges can be a rewarding experience. This section will guide you through the process.
When To Harvest
Knowing when to harvest your luffa is crucial. The ideal time to harvest luffa sponges is when they turn brown and dry on the vine. You can also gently shake the fruit. If you hear seeds rattling inside, it’s ready for harvest. This usually occurs late in the growing season, around 150-200 days after planting.
How To Process Luffa
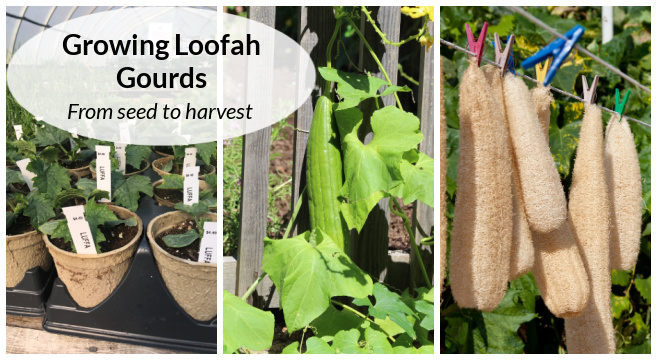
Processing luffa sponges involves several steps. First, cut the luffa from the vine using a sharp knife or scissors. Make sure to wear gloves to protect your hands. Next, peel the skin off the luffa. This can be done by soaking the luffa in water to loosen the skin. Once soaked, the skin should peel off easily.
After peeling, remove the seeds from inside the luffa. You can save these seeds for planting next season. Finally, rinse the luffa thoroughly to remove any remaining debris. Let the sponges dry completely in a warm, sunny place. This drying process can take a few days. Once dry, your luffa sponges are ready to use.
| Step | Action |
|---|---|
| 1 | Cut luffa from the vine |
| 2 | Soak in water to loosen skin |
| 3 | Peel off the skin |
| 4 | Remove seeds |
| 5 | Rinse thoroughly |
| 6 | Dry completely |
Remember, timing and proper processing are key to harvesting high-quality luffa sponges. Enjoy your natural, homegrown sponges!
Using And Storing Luffa Sponges
Once you’ve grown and harvested your luffa sponges, it’s time to put them to use. These natural sponges are versatile and sustainable. They can replace synthetic sponges in your daily routine. Let’s explore how you can use and store them effectively.
Practical Uses
Luffa sponges are perfect for various purposes at home. Here are some practical uses:
- Personal Care: Use luffa sponges in the shower for exfoliation. They help remove dead skin cells and leave your skin smooth.
- Cleaning: Use luffa sponges for washing dishes. They are gentle yet effective on pots and pans.
- Gardening: Use them as natural scrubbers to clean garden tools and pots.
- Crafting: Luffa sponges can be used in DIY projects. They are great for painting and texture work.
Storage Tips
Proper storage ensures your luffa sponges last longer. Follow these tips to keep them fresh:
- Dry Completely: After each use, rinse the luffa thoroughly. Squeeze out excess water and let it dry completely. This prevents mold and bacteria growth.
- Store in a Cool, Dry Place: Keep your luffa sponges in a well-ventilated area. Avoid storing them in damp places like under the sink.
- Replace Regularly: Replace your luffa sponges every 3-4 weeks. This ensures they remain effective and hygienic.
By using and storing your luffa sponges properly, you maximize their lifespan and benefits. Enjoy the natural, eco-friendly alternative to synthetic sponges in your home.
Troubleshooting Common Issues
Growing luffa can be a rewarding experience. But sometimes, issues arise. Here, we discuss common problems and solutions to keep your luffa healthy and thriving.
Growth Problems
Sometimes, luffa plants don’t grow well. This can be frustrating. Below are some common growth issues:
- Yellow Leaves: This usually means too much water or poor soil drainage.
- Slow Growth: Often caused by lack of sunlight or poor soil nutrition.
- Wilting: This can indicate root rot or pest problems.
To solve these issues, ensure your luffa plants get at least six hours of sunlight. Check soil drainage and avoid overwatering. Use compost or organic fertilizer to enrich the soil.
Pest Control Solutions
Pests can harm your luffa plants. Here are common pests and how to control them:
| Pest | Solution |
|---|---|
| Aphids | Use insecticidal soap or a strong water spray. |
| Cucumber Beetles | Hand-pick them or use neem oil. |
| Spider Mites | Introduce beneficial insects or use miticide. |
Regularly inspect your plants for pests. Early detection makes it easier to manage them. Healthy plants are less likely to suffer from pest attacks.
Frequently Asked Questions
How Long Does It Take To Grow Luffa?
Luffa takes about 150 to 200 days to mature. It requires a long growing season. Start seeds indoors in cooler climates.
What Conditions Do Luffa Plants Need?
Luffa plants need full sun and well-drained soil. They thrive in warm temperatures and require regular watering.
When Should I Harvest Luffa Sponges?
Harvest luffa sponges when they turn brown and feel lightweight. The skin should be easy to peel off.
How Do I Start Luffa Seeds?
Start luffa seeds indoors 6-8 weeks before the last frost. Soak seeds overnight to improve germination rates.
Conclusion
Growing luffa sponges is both rewarding and eco-friendly. Follow these tips to enjoy your homegrown sponges. With patience and care, you’ll have a sustainable alternative to store-bought sponges. Start your luffa garden today and experience the benefits firsthand. Happy gardening!
