
Indoor plant propagation through stem cuttings is a fascinating blend of art and science. By leveraging a plant’s inherent ability to reproduce asexually, horticulturalists and enthusiasts can essentially clone a plant, creating an exact genetic replica. Stem cutting propagation isn’t a recent development; in fact, it’s an ancient practice with evidence dating back to prehistoric times when nomadic tribes propagated date palms in Mesopotamia.
By definition, propagation by stem cuttings involves taking a piece of a parent plant and manipulating it to develop its own roots, allowing it to grow into a new, independent plant. A key aspect of this technique is its reliance on meristematic cells in the stem, capable of differentiating into various plant tissues.
Though it might sound complex, stem cutting propagation is a relatively straightforward process, provided the right steps are followed. This article will serve as a comprehensive guide to help you understand and master the technique of propagating indoor plants through stem cuttings. By following these scientifically-backed procedures, you’ll have the ability to multiply your favorite plants, ensuring they thrive in your indoor environment.
What is Plant Propagation through Stem Cuttings?
In the gardening lexicon, ‘propagation’ is the act of creating new plants from existing ones. Among several methods of plant propagation, the technique of using stem cuttings has been highly favored by indoor gardeners. This method involves taking a section of a plant, typically a stem, and coaxing it to develop its own roots.
This approach’s popularity isn’t without reasons. It’s an affordable way to duplicate your favorite plants, save a dying plant, or share a beloved specimen with friends and family. Plus, seeing a new plant emerge from a cutting you’ve planted offers a unique sense of achievement.
As we delve deeper into this topic, it’s essential to grasp the relevance of plant stem anatomy to successful propagation.
How is the Anatomy of a Plant Stem Related to Propagation?
Stems, with their green, leaf-bearing structure, are often dismissed as merely a support system for plants. Yet, they’re intricate structures that play vital roles in a plant’s life, including facilitating successful propagation.
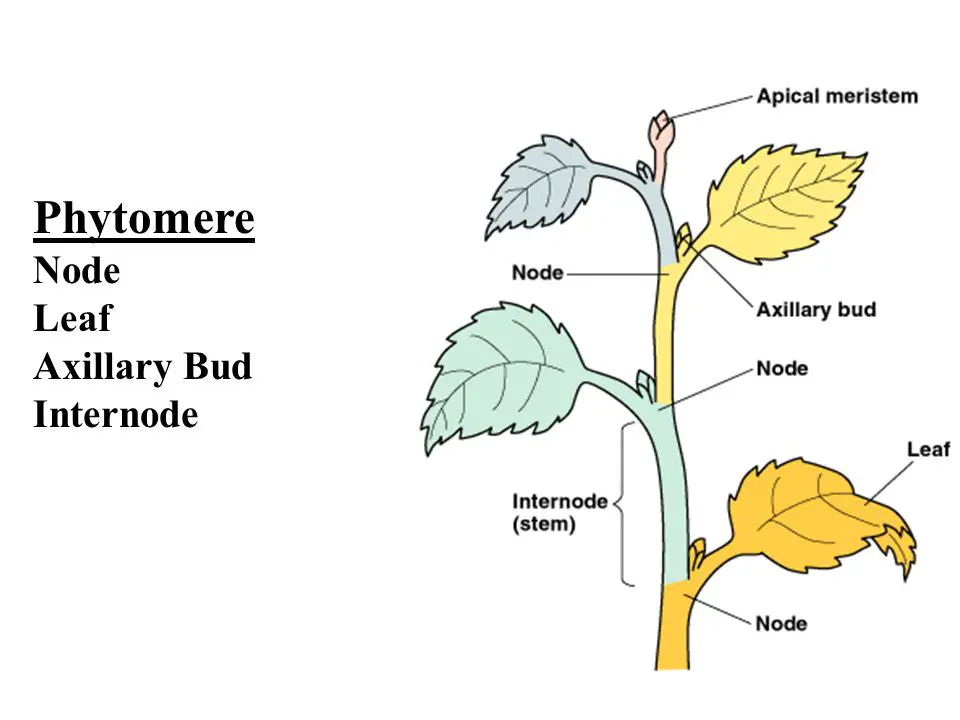
A typical stem comprises nodes (where leaves, buds, and branching twigs originate) and internodes (sections between nodes). Additionally, there are axillary buds, located at the node, between the leaf and stem. Understanding these components is crucial for successful stem cutting propagation.
Role of Nodes and Internodes in Propagation
Nodes and internodes are instrumental in stem cutting propagation. The nodes, often distinguished by a slight bump or swelling, are potential root initiation sites. These are the points where the cutting will develop roots, given the right conditions.
On the other hand, internodes, the length of the stem between nodes, provide the space for new leaves and branches to grow. These are essential for the cutting to develop into a fully grown, balanced plant.
The Importance of Auxins for Stem Cuttings
No exploration of plant propagation would be complete without a mention of auxins. These naturally occurring plant hormones play a significant role in plant growth, especially in the rooting process. They stimulate root initiation at the nodes, which is why many gardeners use a rooting hormone (rich in auxins) when planting their cuttings.
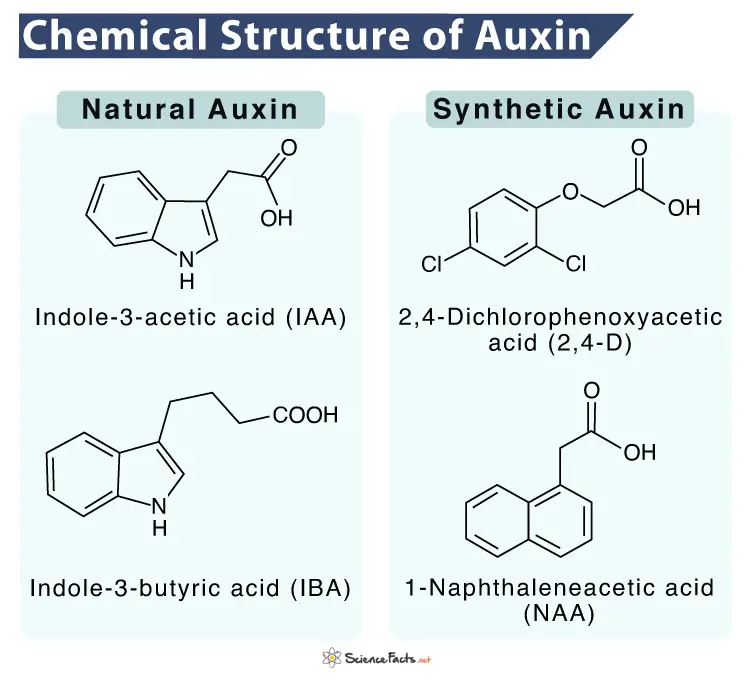
A study published in Plant Cell Reports showed that auxins, specifically indole-3-acetic acid (IAA), enhance root initiation and development in stem cuttings of various plant species. Therefore, providing additional auxins to your cuttings can potentially increase the success rate of propagation.
Knowing which indoor plants are well-suited for this process is the next step in our journey.
Which Indoor Plants are Suitable for Propagation via Stem Cuttings?
There is a broad spectrum of indoor plants that can be propagated effectively via stem cuttings. However, the success of this process depends on several factors.
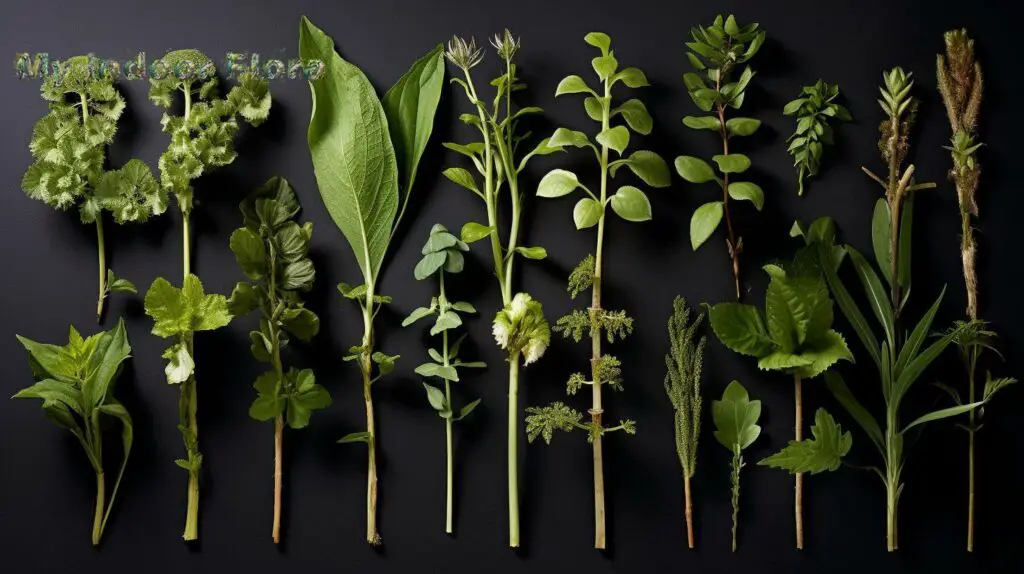
Common Indoor Plants That Can Be Propagated Through Stems
Here’s a list of some common indoor plants that are often propagated through stem cuttings:
- Pothos (Epipremnum aureum)
- Philodendrons (Philodendron spp.)
- ZZ plants (Zamioculcas zamiifolia)
- Spider plants (Chlorophytum comosum)
- Snake plants (Sansevieria spp.)
- Heartleaf Philodendron (Philodendron hederaceum)
- Jade plants (Crassula ovata)
- African violets (Saintpaulia spp.)
However, it’s important to note that each plant species may have specific needs in terms of the cutting length, node number, and propagation environment.
Factors Determining the Suitability of a Plant for Stem Propagation
The key factors that determine a plant’s suitability for stem propagation are:
- Presence of Nodes: As explained earlier, nodes are vital for root initiation. A plant species with clear, well-defined nodes is typically a good candidate for stem cutting propagation.
- Growth Habit: Some plants naturally produce offshoots, which are ideal for taking stem cuttings.
- Health and Vigor: Healthy plants, free of diseases and pests, tend to give rise to healthier cuttings, increasing the success rate of propagation.
Exceptions and Challenging Indoor Plant Species
While many indoor plants respond well to stem cutting propagation, some don’t. For example, monocot plants, like orchids and certain types of ferns, don’t have the typical stem structure with well-defined nodes and internodes. Similarly, many types of cacti require a different propagation approach. Thus, always research your specific plant species before attempting propagation.
Assembling the right toolkit is crucial before you embark on your propagation journey.
What are the Necessary Tools and Materials for Stem Cutting Propagation?
For a successful stem cutting propagation, certain tools and materials are needed. Here’s a list:
Essential Gardening Tools
- Pruning Shears or Knife: This tool is used to make a clean cut on the stem. Ensure it’s sharp to avoid damaging the plant tissue and sterile to prevent introducing diseases.
- Pot or Container: Depending on your preference and the plant’s needs, this could be a pot with soil, a glass of water, or a container filled with a soilless medium.
- Clear Plastic Bag or Wrap: This creates a mini-greenhouse effect, maintaining a high humidity level, ideal for many stem cuttings.
Choosing the Right Growing Medium
The choice of growing medium largely depends on the plant species and your personal preference. Here are some commonly used ones:
- Soil: Many indoor plants root well in regular potting soil. It’s widely available and easy to use.
- Water: Some gardeners prefer rooting their cuttings in water. It’s clean, and you can observe the rooting progress.
- Perlite: This is a popular soilless medium known for its excellent drainage and airiness. It’s often mixed with peat or compost for added nutrients.
- Vermiculite: Like perlite, vermiculite is a soilless medium that’s good for rooting cuttings. It retains more water than perlite, making it a suitable choice for plants that prefer higher moisture levels.
- Sand: Coarse sand is sometimes used for propagating cuttings of succulent plants that need excellent drainage.
Role of Rooting Hormone in Successful Propagation
Rooting hormones, or auxins, as we’ve discussed before, play a vital role in stimulating root growth in cuttings. They’re available in various forms – powder, gel, and liquid. They not only speed up the rooting process but can also increase the overall success rate of propagation.
As the Chinese proverb goes, “The best preparation for tomorrow is doing your best today.” This definitely applies to plant propagation.
How to Prepare for Propagation?
Proper preparation can significantly enhance the success rate of stem cutting propagation. Let’s explore how to identify the right stem for cutting and prepare it for the propagation process.
step 1: Identifying a Suitable Stem for Cutting
When selecting a stem for propagation, look for these characteristics:
- Healthy and Disease-Free: The stem should be vigorous, free of any signs of diseases or pests.
- Mature, but not Woody: Opt for a stem that’s neither too young nor too old. A semi-hardwood stem, which is partially matured, is usually ideal.
- Well-Hydrated: Water the mother plant a day before taking the cutting to ensure the stem is well-hydrated.
Step 2: Making the Cut
Once you’ve identified the perfect stem, it’s time to make the cut. Here are the steps to do it:
- Position your shears or knife at a node. Remember, nodes are the sites where roots will form.
- Make a cut about 1/4 inch below the node. This gives the cutting enough stem to absorb water and nutrients, while still being close enough to the node for efficient root initiation.
- For the upper end of the cutting, make a cut about 1/4 inch above the node. This helps prevent rot and encourages new growth from the node.
- Always make a clean, sharp cut to prevent damage to the plant tissue.
Step 3: How to Prepare the Cutting for Propagation
After severing the stem, there are a few steps to prepare it for propagation:
- Remove the Lower Leaves: The lower one-third to one-half of the stem should be leaf-free. This prevents the leaves from touching the growing medium and rotting.
- Dip in Rooting Hormone: While this is optional, dipping the cut end of the stem in a rooting hormone can enhance the rooting process.
With the cutting prepared, it’s time to plant it.
What is the Best Way to Plant the Stem Cutting?
While planting the stem cutting might seem straightforward, there are a few crucial points to remember.
Step 1: Planting the Cutting in the Chosen Medium
To plant the cutting, follow these steps:
- Make a hole in the growing medium using a pencil or your finger. This prevents the rooting hormone from being wiped off when inserting the stem.
- Insert the stem into the hole, ensuring at least one node is below the surface.
- Firmly pack the medium around the stem to provide support.
Step 2: Creating an Ideal Environment for Rooting
Once the cutting is planted, create an ideal environment for rooting. Providing the right care after planting the stem cutting is crucial to ensuring its survival and growth. Here are some essential care tips:
Maintain Humidity Levels
As mentioned earlier, maintaining high humidity levels is crucial, especially in the initial stages. This can be achieved by enclosing the container in a clear plastic bag or wrap. Remember to ventilate regularly to prevent mold growth.
Water Regularly
The growing medium should be consistently moist but not waterlogged. Check the moisture levels regularly and water as needed. Overwatering can lead to root rot, while underwatering can cause the cutting to dry out.
Provide Indirect Light
The cutting needs a well-lit location with indirect light. Direct sunlight can cause the cutting to dry out, while insufficient light can hinder growth.
Avoid Temperature Extremes
The cutting should be kept in a location with a stable, warm temperature. Avoid placing it near air conditioning vents, heaters, or drafty windows.
Gradually Acclimate to Lower Humidity
Once the cutting has rooted, gradually acclimate it to lower humidity by removing the plastic cover over a week or so. This will prepare the new plant for its life outside the mini-greenhouse environment.
Step 3: Recognizing the Signs of Successful Rooting
The signs of successful rooting typically appear within a few weeks, although this can vary depending on the plant species. The common signs are:
- New Leaf Growth: This is usually the first visible sign of successful rooting. However, it doesn’t always guarantee that roots have formed.
- Resistance when Gently Pulled: If the cutting resists a gentle tug, it’s a good indication that roots have formed.
- Visible Roots: If you’re rooting in water or a transparent container, you might see roots emerging from the nodes.
- Increase in Water Uptake: If the growing medium dries out more quickly than before, it could mean that roots are forming and taking up water.
Knowing when and how to transplant the rooted cutting is the final step in the propagation journey.
How to Transplant Rooted Stem Cuttings?
Once your cutting has rooted, it’s ready to be transplanted to a bigger pot with regular potting soil. Here’s how to do it:
- Gently remove the cutting from the growing medium, taking care not to damage the new roots.
- Choose a pot that’s just slightly bigger than the root ball. Overly large pots can lead to overwatering and root rot.
- Fill the pot with a suitable potting mix for your plant species.
- Make a hole in the center, place the rooted cutting, and firm the soil around it.
- Water thoroughly and place the pot in a location with similar light conditions as before.
- Gradually acclimate the new plant to lower humidity by removing the plastic bag or wrap over a week or so.
Common Issues in Stem Cutting Propagation
Like any gardening endeavor, stem cutting propagation can encounter a few challenges. Here are some common issues and their solutions:
Cutting Wilts or Dries Out
If the cutting wilts or dries out, it might be due to insufficient humidity, too much heat, or lack of water. To solve this, ensure the cutting is enclosed in a plastic bag or wrap, kept away from direct sunlight, and the growing medium is consistently moist.
Cutting Rots
If the cutting rots, it could be due to too much moisture or a disease. To prevent this, ensure the growing medium is well-draining and the cutting is ventilated regularly to prevent mold growth. Also, always start with a healthy, disease-free cutting.
No Root Formation
If there’s no root formation after several weeks, it could be due to improper cutting selection or preparation, wrong planting technique, or unsuitable growing conditions. To address this, ensure you’re following all the steps we’ve discussed in this guide. You might also want to try a different plant species or rooting medium.
Enjoy the Fruit of Your Effort – A Thriving Indoor Garden
Stem cutting propagation is an art as much as a science. It requires patience, practice, and a fair amount of trial and error. Yet, the joy of seeing a new plant emerge from a cutting you’ve nurtured is truly unparalleled. So, arm yourself with knowledge, equip yourself with the right tools, and embark on this rewarding journey. As the ancient Greek philosopher Epictetus said, “No great thing is created suddenly.” And so it is with plant propagation. Happy gardening!